How to scan data into Excel?
Scanning data into Excel involves using optical character recognition (OCR) technology to convert printed or handwritten text into machine-encoded text that can be imported into Excel. Here's a general guide on how to scan data into Excel:
1. Prepare Your Document:
- Ensure that your document is printed clearly and is free of smudges or distortions. If you have a handwritten document, make sure it is legible.
2. Use a Scanner or Mobile App:
Using a Scanner:
Place Document in Scanner:Load your document into a scanner.
Open Scanner Software:Open the scanning software that came with your scanner or use a third-party scanning application.
Select OCR Mode:Look for an OCR mode or an option related to text recognition. Enable this feature.
Adjust Settings:Adjust settings such as language, resolution, and output format. OCR settings may vary depending on the scanning software.
Scan Document:Start the scanning process. The scanner will capture the image and perform OCR to recognize the text.
Save as Text or PDF:Save the scanned document as a text file (.txt) or a PDF file. This will be the file you import into Excel.
Using a Mobile App:
Download OCR App:Install a mobile OCR app on your smartphone or tablet. There are several apps available on various platforms.
Open App and Capture Image:Open the OCR app, select the camera function, and capture an image of the document.
Adjust Image and Recognize Text:Adjust the captured image, if necessary, and use the OCR feature to recognize the text in the image.
Save as Text or PDF:Save the recognized text as a text file (.txt) or a PDF file.
3. Import into Excel:
Open Excel:Open Microsoft Excel on your computer.
Open a New Worksheet:Open a new worksheet in Excel where you want to import the data.
Data Tab:Go to the "Data" tab in the Excel ribbon and select "Get Data" or "Get External Data."
From Text or File:Choose the option that allows you to import data from a text file. This option may be named "From Text" or "From File."
Select Text or PDF File:Navigate to the location where you saved the scanned text file or PDF and select it. Click "Import."
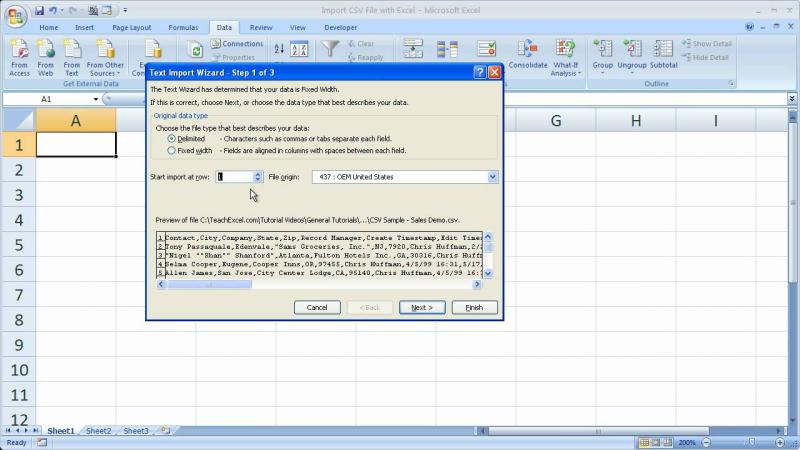
Text Import Wizard:Follow the steps in the Text Import Wizard to specify delimiters and adjust the format if needed. Click "Finish" to complete the import.
Review and Adjust Data:The imported data will now appear in Excel. Review and adjust the data as necessary, ensuring proper column alignment and structure.
Keep in mind that the success of the OCR process depends on the clarity and quality of the scanned document. If the document is complex or contains a lot of formatting, manual adjustments in Excel may be required. Additionally, the steps and options may vary slightly depending on the version of Excel and the OCR software or app you are using.
How to scan data directly into an Excel spreadsheet
To scan data directly into an Excel spreadsheet, you can use the following steps:
- Connect your scanner to your computer.
- Open Excel and create a new spreadsheet.
- Click the Data tab and then click the Get External Data button.
- Select the From Scanner or Camera option and click the OK button.
- In the Select Device dialog box, select your scanner and click the OK button.
- In the Import Data dialog box, select the Table option and click the Next button.
- In the Scan Range dialog box, select the area of the document that you want to scan and click the OK button.
- Excel will scan the document and import the data into the spreadsheet.
- Once the data has been imported, you can review and edit it as needed.
Specialized scanners or techniques for seamless data scanning into Excel
There are a number of specialized scanners and techniques that can be used for seamless data scanning into Excel. These scanners typically have features such as optical character recognition (OCR) and automatic document feeder (ADF) that can make the scanning process faster and more accurate.
One example of a specialized scanner is the CZUR ET18 Plus. This scanner has a built-in OCR engine that can recognize text in over 180 languages. It also has an ADF that can scan up to 180 pages per minute.
Another option is to use a document capture software such as Adobe Acrobat Pro DC. This software can scan documents and convert them to a variety of file formats, including Excel. It also has a number of features that can help you to organize and manage your scanned documents.
Advantages and limitations of scanning data directly into Excel
There are a number of advantages to scanning data directly into Excel. These advantages include:
- It is a fast and easy way to import data into Excel.
- It can save you time and effort compared to manually entering the data.
- It can help to reduce errors.
However, there are also some limitations to scanning data directly into Excel. These limitations include:
- Scanned data may need to be cleaned up and formatted before it can be used in Excel.
- Scanned images may not be imported correctly into Excel.
- Scanned data may not be compatible with all Excel features.
Overall, scanning data directly into Excel is a convenient and efficient way to import data into Excel. However, it is important to be aware of the limitations of this method.
Here are some additional tips for scanning data directly into Excel:
- Make sure that your scanner is properly configured.
- Use a high-quality scanner to get the best results.
- Scan the document at a high resolution.
- Preview the scanned data before importing it into Excel.
- Clean up and format the scanned data as needed.
- Test the scanned data to ensure that it is compatible with Excel.


