How to enable tcp/ipv4 in Windows 10?
Enabling TCP/IPv4 in Windows 10 is a straightforward process, and it is often already enabled by default. However, if you need to check or enable it for any reason, here is a step-by-step guide:
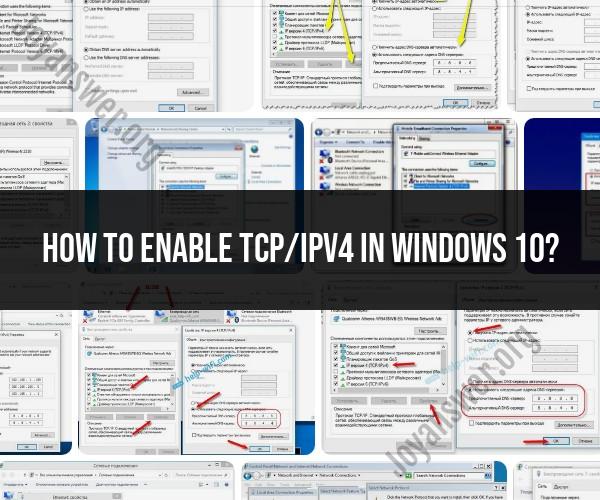
Open Network Connections:
- Press the
Windowskey on your keyboard or click on the Windows icon in your taskbar to open the Start menu.
- Press the
Access Network Settings:
- Type "Network Settings" or "Network Connections" into the search bar and press
Enter. - Alternatively, you can also access this through the Control Panel. Open the Control Panel by typing "Control Panel" in the search bar and pressing
Enter, then navigate to "Network and Sharing Center" or "Network and Internet" and select "Network and Sharing Center."
- Type "Network Settings" or "Network Connections" into the search bar and press
View Network Adapters:
- In the Network settings or Network and Sharing Center, look for "Change adapter settings" or a similar option on the left-hand side. Click on it to view your network adapters.
Locate Your Network Adapter:
- You will see a list of network connections, including Ethernet and Wi-Fi (Wireless) adapters. Identify the network adapter for which you want to enable or check TCP/IPv4.
Check TCP/IPv4 Status:
- Right-click on the network adapter for which you want to enable or check TCP/IPv4 (e.g., Ethernet or Wi-Fi) and select "Properties."
Enable TCP/IPv4:
- In the Properties window, you will see a list of items that you can enable or disable for your network adapter. Look for "Internet Protocol Version 4 (TCP/IPv4)" in the list.
- If it's not checked, click on it to select it.
Confirm Changes:
- Click the "OK" button to save the changes.
Close Network Settings:
- Close the Network settings or Network and Sharing Center window.
That's it! You've now enabled TCP/IPv4 for the selected network adapter on your Windows 10 computer. Please note that for most users, TCP/IPv4 is enabled by default, and you may not need to make any changes unless you have specific network configuration requirements.
Remember that making changes to network settings can affect your internet connectivity, so be cautious when modifying these settings, and make sure you understand the implications of the changes you're making.