How do you insert columns and rows?
Inserting columns and rows in spreadsheets, such as Microsoft Excel or Google Sheets, is a common and useful task for organizing data. Here's a quick tutorial on how to do it:
Inserting Columns:
In Excel (the process is similar in other spreadsheet software):
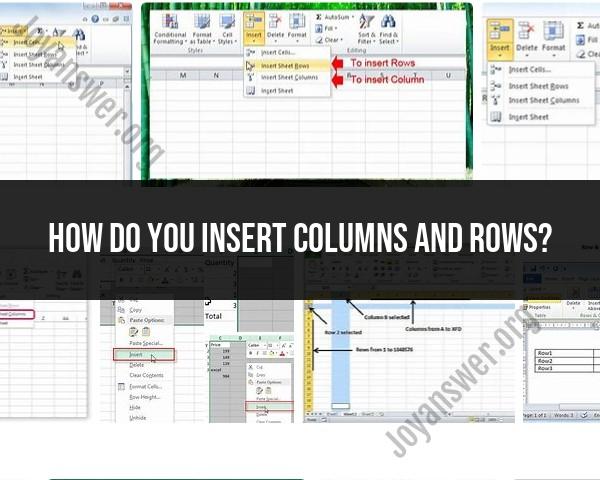
- Select the column to the right of where you want to insert a new column. Click on the lettered header of that column to select the entire column.
- Right-click on the selected column header, and from the context menu, choose "Insert."
In Google Sheets:
- Select the column to the right of where you want to insert a new column. Click on the lettered header of that column to select the entire column.
- Go to the "Insert" option in the top menu, then select "Column left" or "Column right," depending on where you want the new column to appear.
Inserting Rows:
In Excel:
- Select the row below where you want to insert a new row. Click on the numbered header of that row to select the entire row.
- Right-click on the selected row header and choose "Insert" from the context menu.
In Google Sheets:
- Select the row below where you want to insert a new row. Click on the numbered header of that row to select the entire row.
- Go to the "Insert" option in the top menu, then select "Row above" or "Row below," depending on where you want the new row to appear.
Remember that when you insert a new column or row, it will push the existing columns or rows to the right or below. Any data or formatting in those adjacent cells will be shifted to accommodate the new column or row.
These steps allow you to easily insert columns and rows in your spreadsheet, making it more organized and flexible for data management and analysis.
Inserting Columns and Rows: Step-by-Step Instructions
To insert a column in Excel:
- Select the cell to the right of where you want to insert the new column.
- Click the Insert tab on the ribbon.
- In the Cells group, click Insert Sheet Columns.
To insert a row in Excel:
- Select the cell below where you want to insert the new row.
- Click the Insert tab on the ribbon.
- In the Cells group, click Insert Sheet Rows.
You can also insert columns and rows by right-clicking on a cell and selecting Insert > Columns or Insert > Rows.
Customizing Your Spreadsheets with Columns and Rows
You can customize your spreadsheets with columns and rows in a variety of ways. For example, you can:
- Change the width of columns and rows. To do this, select the column or row and drag the border to the desired width.
- Hide or unhide columns and rows. To do this, right-click on the column or row header and select Hide or Unhide.
- Group or ungroup columns and rows. To do this, select the columns or rows and then click the Group & Ungroup button in the Cells group on the Home tab.
- Merge or split cells. To do this, select the cells and then click the Merge & Center button or the Split Cells button in the Cells group on the Home tab.
Efficient Methods for Adding Columns and Rows in Documents
There are a few efficient methods for adding columns and rows in documents. One method is to use the Insert tab on the ribbon. This is the method described in step 1 above.
Another method is to use keyboard shortcuts. To insert a column, press Ctrl+Shift++. To insert a row, press Ctrl++.
Finally, you can also use the AutoFit feature to automatically adjust the width of columns and rows to fit the data. To do this, select the column or row and then double-click the border.
Organizing and Structuring Data with Columns and Rows
Columns and rows can be used to organize and structure data in a variety of ways. For example, you can use columns to group related data together, such as customer name, address, and phone number. You can use rows to group data by category, such as product name, price, and quantity.
You can also use columns and rows to create tables. Tables are a powerful way to organize and format data. To create a table, select the range of cells that you want to include in the table and then click the Insert tab on the ribbon. In the Tables group, click Table.
Excel Proficiency through Column and Row Management
Column and row management is an essential skill for Excel proficiency. By understanding how to insert, delete, format, and organize columns and rows, you can create more efficient and effective spreadsheets.
Here are a few tips for column and row management in Excel:
- Use descriptive column and row headers. This will make it easier to understand your data and to find the information you need.
- Use consistent formatting for columns and rows. This will make your spreadsheets look more professional and easier to read.
- Use tables to organize your data. Tables are a powerful way to format and filter data.
- Freeze columns and rows to keep them visible when you scroll through your spreadsheet.
- Use column and row formulas to perform calculations on your data.
By following these tips, you can improve your Excel proficiency and create more efficient and effective spreadsheets.