How to insert a table in a Microsoft Word document?
Inserting a table in a Microsoft Word document is a straightforward process. Here are the step-by-step instructions:
Open Microsoft Word: Launch Microsoft Word and open the document in which you want to insert the table.
Place Your Cursor: Click the location in your document where you want to insert the table. This is where the upper-left corner of the table will be placed.
Insert a Table:
a. Ribbon Method:
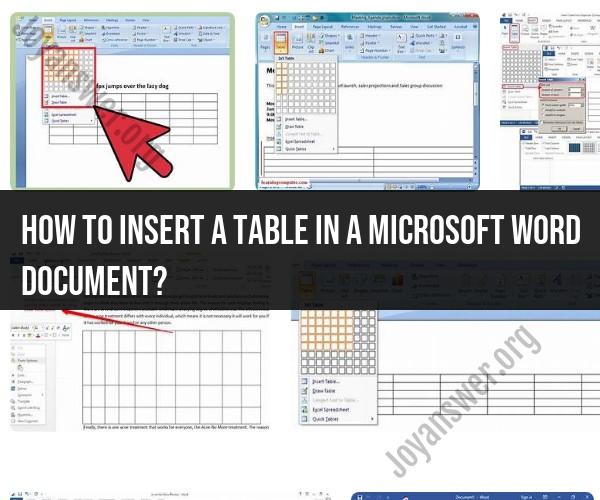
- Go to the "Insert" tab in the Word ribbon at the top of the window.
- Look for the "Table" button in the "Tables" group. Click the dropdown arrow next to it.
b. Shortcut Method:
- Alternatively, you can use a keyboard shortcut to quickly insert a table. Press
Alt+N(for Insert) followed byT(for Table). This will bring up a grid for you to specify the size of the table.
Specify Table Size: If you're using the Ribbon method, hover your mouse over the grid that appears when you click the "Table" button. You can then drag your mouse to select the number of rows and columns you want for your table. Click to confirm your selection.
If you're using the Shortcut method, after pressing
Alt+N+T, use the arrow keys to navigate the grid and specify the number of rows and columns. PressEnterto confirm your selection.Populate the Table: Once the table is inserted, you can start typing text or adding content to the cells. Simply click inside a cell and start typing. You can also use the tab key to move between cells.
Table Tools: When you click inside the table, you'll see the "Table Tools" tab appear in the Word ribbon. This tab contains options for formatting and working with tables, such as adjusting cell size, changing borders, and more.
Customize the Table: You can further customize the table by right-clicking on it and using the context menu to access various table-related options.
Save Your Document: Don't forget to save your document after inserting and formatting the table.
That's it! You have successfully inserted a table into your Microsoft Word document. You can now populate the table with your data and use the available tools to format it as needed.
Inserting Tables in Microsoft Word: Step-by-Step Instructions
To insert a table in Microsoft Word, follow these steps:
- Open the Word document where you want to insert the table.
- Click the Insert tab on the ribbon.
- In the Tables group, click the Table button.
- A grid will appear. Drag the cursor over the grid to select the number of columns and rows you want in your table.
- Once you have selected the number of columns and rows, click the OK button.
- A table will be inserted into your document.
You can now start typing data into the table cells. To move between cells, use the arrow keys on your keyboard. To add a new row or column, click the Insert button in the Table Tools ribbon tab and select the desired option.
Document Formatting Made Easy: How to Add Tables in Word
Tables can be a great way to format your Word documents and make them easier to read and understand. For example, you can use a table to display a list of data, such as sales figures or product information. You can also use a table to create a layout for your document, such as a table of contents or an index.
To add a table to your Word document, follow the steps above. Once you have inserted the table, you can start formatting it to meet your needs. For example, you can change the font, font size, and font color of the text in the table. You can also change the border style and color of the table.
To format a table, click anywhere in the table to select it. Then, click the Table Tools ribbon tab. This ribbon tab contains a variety of options for formatting tables, including:
- Design: This tab contains options for changing the overall appearance of your table, such as the table style, table border, and table shading.
- Layout: This tab contains options for changing the layout of your table, such as the column width, row height, and cell alignment.
- Insert: This tab contains options for inserting rows, columns, and cells into your table.
- Delete: This tab contains options for deleting rows, columns, and cells from your table.
Enhancing Your Word Documents: The Art of Table Insertion
Tables can be a great way to enhance your Word documents and make them more professional and visually appealing. Here are a few tips for inserting tables in Word:
- Use tables to organize and present data in a clear and concise way.
- Use tables to create a layout for your document, such as a table of contents or an index.
- Use tables to add visual interest to your document. For example, you can use tables to create charts and graphs.
- Use tables to format your document and make it easier to read and understand. For example, you can use tables to highlight important information or to break up large blocks of text.
When inserting tables in Word, be sure to consider the following tips:
- Use a consistent style for all of the tables in your document.
- Choose a table style that complements the overall design of your document.
- Make sure that the table is easy to read and understand. Avoid using too many columns or rows.
- Use table borders to separate the different parts of your table and to make it easier to read.
- Use table shading to highlight important information or to break up large blocks of text.
Tables can be a great way to enhance your Word documents and make them more professional and visually appealing. By following these tips, you can insert tables in Word that will improve the appearance and readability of your documents.