How to create a new subject in Diss?
Creating a new subject in a diss track involves selecting an individual, group, or entity to be the target of your lyrical criticism or commentary. Here are step-by-step instructions on how to create a new subject in a diss track:
Identify Your Target:Determine who or what you want to diss. This could be a rival rapper, a celebrity, a public figure, or even a non-human entity or concept. Your subject can be a person, a group of people, an organization, or anything that you believe is worthy of criticism or commentary.
Research and Gather Information:If your diss track is based on real-life individuals or events, gather information and background on your chosen subject. This may include their actions, controversies, achievements, or personal details that you can use in your lyrics.
Define Your Message:Decide on the specific message or criticism you want to convey in your diss. What is the central point you want to make, and what are the key reasons for your criticism? Be clear about your purpose and the message you want to deliver.
Brainstorm and Write Lyrics:Start brainstorming and writing your diss lyrics. Use wordplay, metaphors, clever insults, and humor to express your message. Be creative with your language and focus on making your lyrics engaging and entertaining.
Organize Your Lyrics:Organize your lyrics into verses and possibly a chorus. In the verses, you can elaborate on your criticisms and include supporting details or anecdotes. The chorus should be catchy and memorable, serving as a hook for your diss track.
Craft a Strong Opening Line:The opening line is crucial for grabbing the listener's attention. Craft a strong and attention-grabbing first line that sets the tone for your diss track.
Refine and Edit:After you've written your lyrics, take the time to edit and refine them. Make sure the lyrics flow smoothly and that your message is clear.
Consider Your Delivery:Think about how you'll deliver your diss track. Practice your flow, timing, and pronunciation to ensure that your lyrics are delivered effectively.
Select a Beat:Find a suitable instrumental or beat that complements your diss track. The beat should match the tone and style of your lyrics.
Record Your Diss Track:Use recording equipment and software to record your diss track. Pay attention to vocal clarity and audio quality.
Mix and Master:After recording, mix and master your diss track to achieve the desired sound quality. Adjust audio levels and add any effects as needed.
Release and Share:Once your diss track is ready, release it on platforms like SoundCloud, YouTube, or other music sharing platforms. Share it with your audience and promote it through social media or other channels.
Remember that diss tracks are a form of artistic expression and often part of the competitive and creative nature of the rap genre. While they can be critical and provocative, it's important to approach the process with respect for the boundaries of language and the potential impact of your lyrics on others.
Assuming you're referring to the Defense Information System for Security (DISS), here's a comprehensive guide on creating and managing subjects in DISS:
Creating a New Subject in Diss: A Step-by-Step Guide
To create a new subject in DISS, follow these steps:
Access DISS: Ensure you have authorized access to DISS and log in using your credentials.
Navigate to Subject Management: Locate the Subject Management section within the DISS interface.
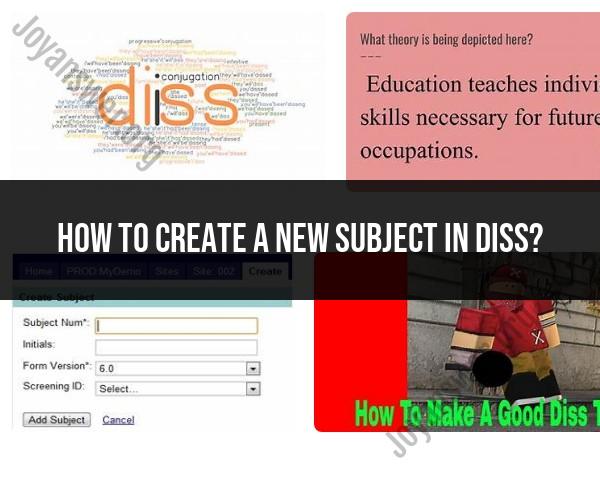
Select Create Subject: Click on the "Create Subject" button or option to initiate the subject creation process.
Enter Subject Information: Fill in the required fields, including the subject's name, SSN, first and last name, birth country, and citizenship information.
Assign Category and Relationship: Choose the appropriate category type (Industry, Government, etc.) and select the relevant category code.
Add Relationships: If applicable, establish relationships with other subjects by selecting the "Add Relationship" button and providing the necessary details.
Review and Submit: Carefully review the entered information for accuracy and completeness. Click "Create Subject" to finalize the process.
Organizing Your Content with Diss Subjects
Subjects in DISS serve as organizational units for managing information related to individuals. By effectively utilizing subjects, you can:
Categorize Information: Group related information under specific subjects to streamline access and retrieval.
Apply Access Controls: Set permissions and restrictions based on subject categories to ensure authorized access to sensitive information.
Track Investigations: Organize investigative data and documents under relevant subjects to maintain a clear audit trail.
Facilitate Collaboration: Share information and collaborate with other authorized users by granting access to specific subjects.
Customizing Subjects for Efficient Information Management
DISS provides customization options to enhance subject management:
Subject Attributes: Add custom attributes to subjects to capture additional information relevant to your organization's needs.
Relationship Types: Define custom relationship types to reflect specific connections between subjects, such as familial ties or business associations.
Workflow Rules: Implement workflow rules to automate tasks and notifications based on subject actions, such as new relationship creation or attribute updates.
Tips and Best Practices for Subject Creation in Diss
Follow these tips for effective subject creation:
Use Consistent Naming Conventions: Establish clear naming conventions for subjects to ensure uniformity and easy identification.
Provide Accurate Information: Ensure the information entered for each subject is accurate, complete, and up-to-date.
Regularly Review Subjects: Periodically review existing subjects to verify their relevance and update any outdated information.
Utilize Customization Options: Leverage custom attributes and relationship types to tailor DISS to your organization's specific needs.
Integrating New Subjects into Your Diss Workflow
Incorporate new subjects seamlessly into your workflow:
Train Users: Provide training to authorized users on subject creation, management, and access control procedures.
Establish Standard Procedures: Develop standard operating procedures for creating and managing subjects to ensure consistency across the organization.
Integrate with Existing Systems: If applicable, integrate DISS with other relevant systems to streamline data exchange and maintain data integrity.
Continuously Evaluate: Regularly assess the effectiveness of your subject management practices and make adjustments as needed.