How to setup RSS newsletter emailing system using Mailchimp?
Setting up an RSS newsletter in Mailchimp allows you to automatically send updates from your website or blog to your subscribers. Here's a step-by-step guide on how to set up an RSS campaign in Mailchimp:
Step 1: Log In to Your Mailchimp Account
If you don't have a Mailchimp account, sign up and log in to your account.
Step 2: Create a New Campaign
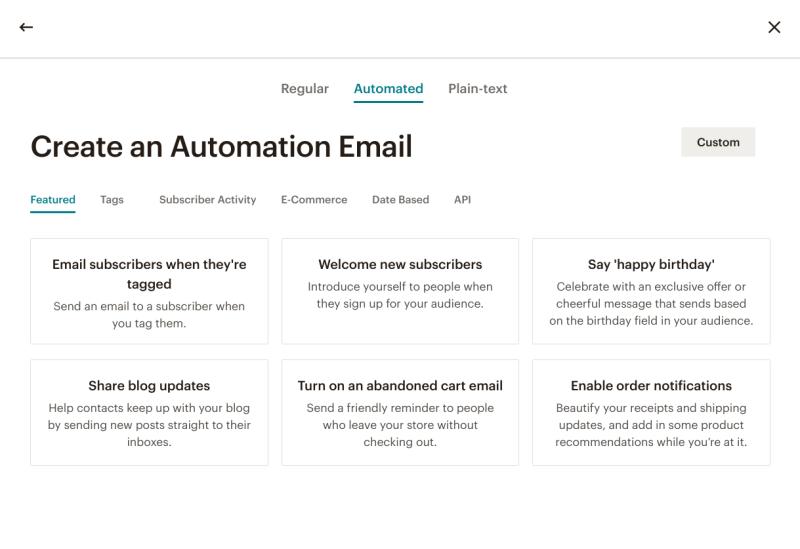
From the Mailchimp dashboard, click on "Create" and select "Email."
Choose "Automated" and then select "Share blog updates."
Step 3: Choose Your RSS Feed
Enter your RSS feed URL. This is usually the URL of your blog or website with "/feed" or "/rss" at the end (e.g., "https://yourwebsite.com/feed").
Click "Next."
Step 4: Set Up Campaign Info
Enter a name for your campaign and choose the audience you want to send the updates to.
Click "Next."
Step 5: Design Your Email
Customize the design of your email using Mailchimp's drag-and-drop editor. You can choose the layout, colors, and add elements like the blog post title, date, and excerpt.
Click "Next" when you are satisfied with the design.
Step 6: Configure Campaign Settings
Set the frequency of your campaign. You can choose daily, weekly, or monthly.
Choose the time and day you want the campaign to be sent.
Click "Next."
Step 7: Confirm and Start Sending
Review your campaign details.
If everything looks good, click "Start Sending."
Step 8: Monitor Campaign Performance
After your RSS campaign is set up and running, you can monitor its performance through the Mailchimp dashboard. Track metrics such as open rates, click-through rates, and subscriber engagement.
Mailchimp will automatically pull in new content from your RSS feed and send it to your subscribers based on the frequency and schedule you've set.
It's important to note that Mailchimp's interface may evolve over time, and specific steps might vary slightly. Always refer to Mailchimp's official documentation or support resources for the most up-to-date and detailed guidance.
What steps are involved in establishing an RSS-based newsletter system using Mailchimp?
Here are the steps involved in establishing an RSS-based newsletter system using Mailchimp:
1. Prepare your RSS feed:
- Ensure your RSS feed is active and publicly accessible.
- Check your feed for any errors or formatting issues.
- Consider using a tool like Feedburner to optimize and manage your RSS feed.
2. Create an RSS campaign in Mailchimp:
- Go to the "Campaigns" section and select "Create Campaign."
- Choose "RSS-Driven" as the campaign type.
- Enter the URL of your RSS feed.
3. Configure campaign settings:
- Schedule: Choose how often you want your newsletter to be sent based on your RSS feed updates.
- List: Select the Mailchimp list(s) you want to send the newsletter to.
- Content: You can customize the email content that wraps around your RSS feed entries.
- Personalization: Use merge tags to personalize the email content with subscriber information.
- Automation: Set up automation workflows based on specific triggers, such as sending a welcome email when a new subscriber joins the list.
4. Design your email template:
- Choose a pre-designed template from Mailchimp's library or create your custom template.
- Use design elements like images, branding, and formatting to create a visually appealing newsletter.
- Ensure your template is responsive and displays correctly on all devices.
5. Test and preview your newsletter:
- Use the "Preview and Test" feature to see how your newsletter will look in different email clients and on various devices.
- Send a test email to yourself or a small group of subscribers to identify any final issues.
6. Launch your RSS-based newsletter:
- Once you're satisfied with your campaign settings and design, click the "Start RSS" button to activate your automated newsletter system.
Additional Tips:
- Optimize your RSS feed: Include relevant keywords and summaries in your feed entries to improve their visibility.
- Segment your audience: Use Mailchimp's segmentation features to send targeted newsletters based on subscriber interests or demographics.
- Monitor and analyze performance: Track key metrics like open rates, click-through rates, and subscriber engagement to measure the effectiveness of your newsletter.
- Fine-tune your campaign: Based on your performance data, make adjustments to your RSS feed, campaign settings, or email content to improve results.
By implementing these steps and taking advantage of Mailchimp's features, you can establish an efficient and automated RSS-based newsletter system that keeps your subscribers engaged and informed.