How to import chart of accounts in QuickBooks?
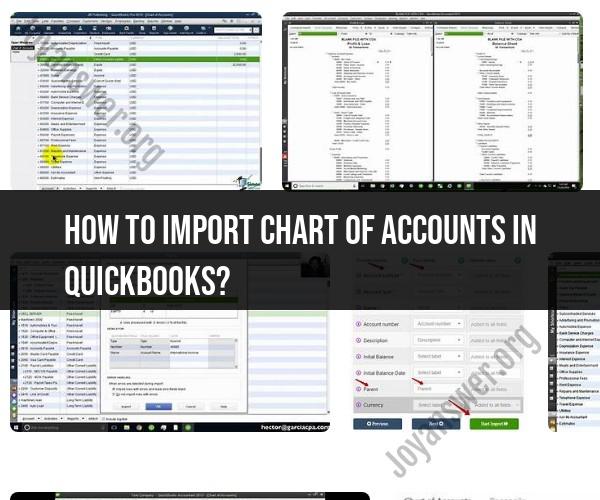
Importing a Chart of Accounts into QuickBooks can be a convenient way to set up your financial accounts, especially if you have a lengthy list or are transitioning from another accounting system. Here's a quick guide on how to import a Chart of Accounts into QuickBooks Online:
Before you begin, make sure you have your Chart of Accounts data prepared in a compatible format, such as a CSV or Excel spreadsheet.
Log In to QuickBooks:
- Go to the QuickBooks Online website and log in to your account using your username and password.
Access the Import Tool:
- From the Dashboard or the left sidebar, click on "Accounting" and then select "Chart of Accounts."
Access the Import Option:
- In the Chart of Accounts, click the "Import" button. QuickBooks will guide you through the import process.
Upload Your Data File:
- Click the "Browse" button or similar to upload your CSV or Excel spreadsheet with your Chart of Accounts data. Follow the on-screen instructions to map your data columns to QuickBooks fields.
Review and Confirm:
- QuickBooks will display a preview of the data to be imported. Carefully review this preview to ensure the mapping is correct. If everything looks good, click "Next."
Confirm Mapping and Import:
- Confirm the mapping of columns in your data to the corresponding fields in QuickBooks. Make any necessary adjustments. When you're satisfied with the mapping, click "Next."
Import Data:
- Click "Import" to initiate the data import process. QuickBooks will process the data and create the Chart of Accounts based on your import file.
Review Imported Accounts:
- Once the import is complete, you will see a list of the imported accounts. Review them to make sure everything is as expected.
Run Reports to Verify:
- After the import, run reports (e.g., Profit and Loss, Balance Sheet) to ensure that your accounts are correctly reflected in your financial statements.
It's crucial to double-check the mapping and data in your import file to avoid errors in your Chart of Accounts. If your business has specific account types or custom fields, ensure that your data aligns with the QuickBooks account structure.
Remember that the specific steps and options may vary slightly depending on your version of QuickBooks (e.g., QuickBooks Desktop, QuickBooks Self-Employed). If you encounter difficulties during the import process, QuickBooks provides user guides and customer support to help you with the process.
How to import a chart of accounts in QuickBooks
To import a chart of accounts in QuickBooks Online, follow these steps:
- Go to Settings > Import Data.
- Select Chart of Accounts.
- Click Browse and select the file containing the chart of accounts you want to import.
- Click Open.
- Review the mapping of accounts between your imported chart of accounts and QuickBooks. You can make changes to the mappings as needed.
- Click Import.
To import a chart of accounts in QuickBooks Desktop, follow these steps:
- Go to File > Utilities > Import > Chart of Accounts.
- Select the file containing the chart of accounts you want to import.
- Click Next.
- Review the mapping of accounts between your imported chart of accounts and QuickBooks. You can make changes to the mappings as needed.
- Click Finish.
What is the process for setting up a chart of accounts in QuickBooks?
To set up a chart of accounts in QuickBooks, follow these steps:
- Identify the types of accounts you need to track, such as assets, liabilities, equity, revenue, and expenses.
- Create a parent account for each type of account.
- Create sub-accounts to further organize your accounts.
- Assign each account to a specific category.
- Review your chart of accounts to make sure that it is complete and accurate.
Can you import an existing chart of accounts from another system into QuickBooks?
Yes, you can import an existing chart of accounts from another system into QuickBooks. QuickBooks supports a variety of file formats, including CSV, TXT, and IIF.
How to customize and map accounts during the import process in QuickBooks?
When importing a chart of accounts into QuickBooks, you can customize and map accounts by:
- Selecting the account type for each account
- Renaming accounts
- Merging accounts
- Splitting accounts
- Mapping accounts to specific categories
Are there any limitations or best practices for importing charts of accounts in QuickBooks?
Here are some limitations and best practices for importing charts of accounts in QuickBooks:
- Make sure that the file containing the chart of accounts is in a supported format.
- Review the mapping of accounts before importing the chart of accounts.
- Back up your QuickBooks data before importing the chart of accounts.
- If you are unsure about how to import a chart of accounts, consult with a qualified accountant or QuickBooks advisor.
Here are some additional tips for importing charts of accounts in QuickBooks:
- Use a consistent naming convention for your accounts when exporting the chart of accounts from the other system.
- Make sure that the account types in the exported chart of accounts match the account types in QuickBooks.
- If you are importing a chart of accounts from a large system, consider importing the chart of accounts in batches.
- After importing the chart of accounts, review your financial reports to make sure that the data is accurate.