How to edit the chart of accounts in QuickBooks?
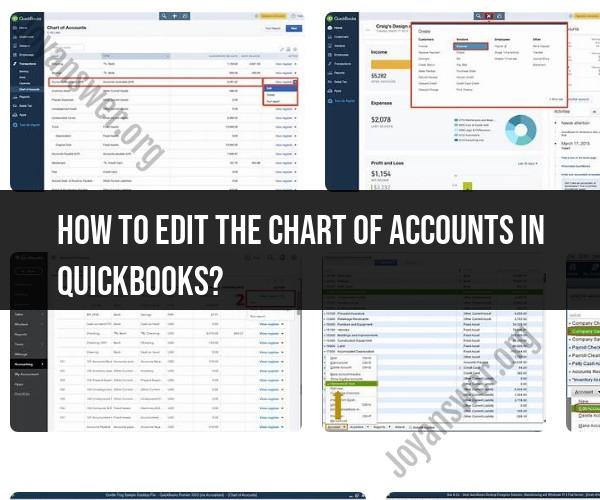
Editing the Chart of Accounts in QuickBooks is a straightforward process that allows you to customize your financial accounts to better suit your business needs. Here's a step-by-step guide on how to edit the Chart of Accounts in QuickBooks Online:
Log In to QuickBooks:
- Go to the QuickBooks Online website and log in to your account using your username and password.
Access the Chart of Accounts:
- From the Dashboard or the left sidebar, click on "Accounting" or "Chart of Accounts" to access your Chart of Accounts.
Locate the Account to Edit:
- In the Chart of Accounts, find the account you want to edit. You can use the search bar or scroll through the list of accounts.
Edit the Account:
- Click on the account you want to edit. This will open the Account Information page.
Edit Account Details:
- On the Account Information page, you can edit various details, including the account name, account type, detail type, description, and subaccount settings (if applicable). Make the necessary changes to the account.
Save Your Changes:
- After making your edits, click the "Save" or "Save and Close" button to save your changes.
Review Your Changes:
- Double-check to ensure that the account details have been updated as desired.
Repeat for Additional Accounts:
- If you need to edit more accounts, repeat the process for each one.
Customize Account Numbers (Optional):
- If you want to use custom account numbers, you can enable this feature by clicking the gear icon at the top of the Chart of Accounts and selecting "Account and Settings." Under "Advanced," you can enable custom account numbers and define a number for each account.
Run Reports to Verify Changes:
- After editing your Chart of Accounts, run reports (e.g., Profit and Loss, Balance Sheet) to ensure that your accounts are correctly reflected in your financial statements.
It's important to be cautious when editing your Chart of Accounts, especially if your business relies on accurate financial records. Make sure you understand the impact of changes on your financial reporting. If you're unsure about which changes to make, consider consulting with a financial professional or your accountant for guidance.
Note that the steps mentioned here are for QuickBooks Online. If you're using QuickBooks Desktop or a different version of QuickBooks, the steps may vary slightly, but the general process remains similar.
How to edit the chart of accounts in QuickBooks?
To edit the chart of accounts in QuickBooks Online, follow these steps:
- Go to Settings > Chart of Accounts.
- Select the account you want to edit and click Edit.
- Make the desired changes to the account and click Save and Close.
To edit the chart of accounts in QuickBooks Desktop, follow these steps:
- Go to Lists > Chart of Accounts.
- Right-click the account you want to edit and select Edit Account.
- Make the desired changes to the account and click Save & Close.
What are the common reasons for modifying a chart of accounts in QuickBooks?
Common reasons for modifying a chart of accounts in QuickBooks include:
- Adding new accounts to track new business activities, such as new products or services, new sales channels, or new departments
- Deleting accounts that are no longer used
- Renaming accounts to make them more clear or consistent
- Reorganizing account categories or sub-accounts to improve the structure of the chart of accounts
Can you add, delete, or rename accounts in the chart of accounts in QuickBooks?
Yes, you can add, delete, and rename accounts in the chart of accounts in QuickBooks. However, it is important to note that deleting or renaming accounts can affect your financial reports and may require you to adjust your transactions.
How to reorganize account categories or sub-accounts in QuickBooks?
To reorganize account categories or sub-accounts in QuickBooks Online, follow these steps:
- Go to Settings > Chart of Accounts.
- Click the Edit button next to the account category or sub-account you want to move.
- In the Move section, select the new parent account category or sub-account.
- Click Save and Close.
To reorganize account categories or sub-accounts in QuickBooks Desktop, follow these steps:
- Go to Lists > Chart of Accounts.
- Right-click the account category or sub-account you want to move and select Move Account.
- In the Move Account window, select the new parent account category or sub-account.
- Click OK.
Are there considerations for maintaining accuracy and consistency in the chart of accounts in QuickBooks?
Yes, there are a few considerations for maintaining accuracy and consistency in the chart of accounts in QuickBooks:
- Use a consistent naming convention for your accounts. This will make it easier to find and manage your accounts, and it will also improve the accuracy of your financial reports.
- Avoid using duplicate accounts. Each account should represent a unique business activity or financial transaction.
- Use sub-accounts to organize your accounts into logical categories. This will help you to track your finances more effectively and to generate more accurate financial reports.
- Regularly review your chart of accounts to make sure that it is up-to-date and that it meets your business needs.
If you are unsure about how to modify the chart of accounts in QuickBooks, or if you have any other questions, it is always best to consult with a qualified accountant or QuickBooks advisor.