How to make a beautiful sketch?
Here’s a clear, step-by-step guide to creating a beautiful sketch, taking you from beginner to more advanced techniques:
1. Gather Your Materials
Pencils: Start with a range (2H, HB, 2B, 4B, 6B) for different shades.
Paper: Smooth sketching paper is ideal for beginners.
Erasers: Kneaded erasers allow subtle corrections without damaging paper.
Optional: Blending stumps or tissue for shading.
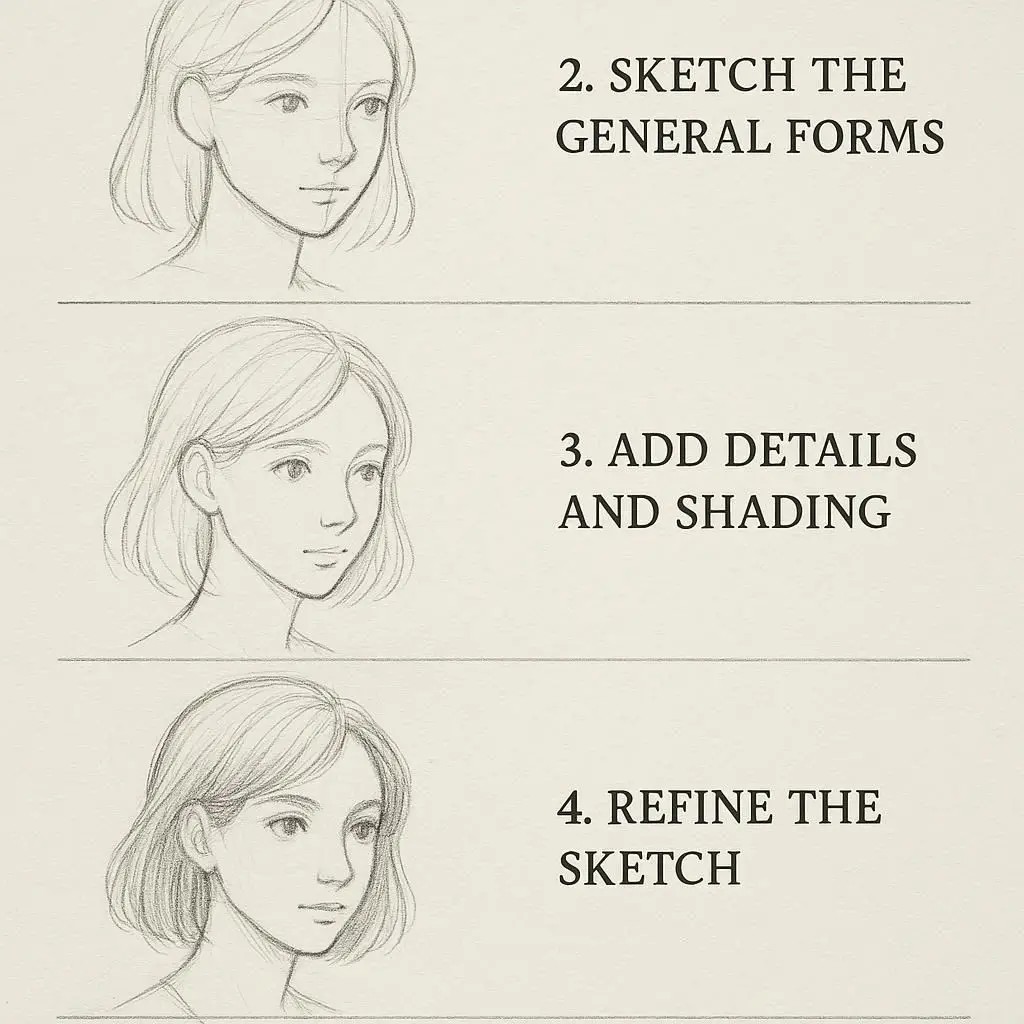
2. Start with Basic Shapes
Break your subject into simple shapes (circles, squares, triangles).
This helps maintain proportion and perspective.
For example, a face can start with an oval for the head, lines for eyes, nose, and mouth placement.
3. Focus on Proportions
Use reference images to understand correct sizes and distances.
Check relationships: e.g., eyes are usually one eye-width apart.
Beginners should lightly sketch guidelines to adjust before darkening lines.
4. Learn Shading and Texture
Hatching: Parallel lines to create shadows.
Cross-hatching: Overlapping lines for darker areas.
Blending: Smooth out pencil strokes for soft shadows.
Textures: Use short strokes, dots, or patterns to depict hair, fabric, or rough surfaces.
5. Pay Attention to Light and Shadow
Identify your light source.
Shadows and highlights give depth and realism.
Avoid coloring all areas evenly; contrast makes sketches more dynamic.
6. Refine Your Sketch
Erase unnecessary guidelines.
Darken important outlines gently.
Add details gradually—eyes, hair strands, wrinkles, or folds in clothing.
7. Practice Regularly
Sketch daily, even small objects.
Try different subjects: still life, portraits, landscapes.
Experiment with different styles (realistic, cartoon, abstract).
8. Tips for Advancing to Pro Level
Observation: Study anatomy, perspective, and proportion deeply.
References: Use photos or real-life subjects.
Experiment: Try ink, colored pencils, or digital sketching.
Critique: Compare your sketches with professional works to learn improvement points.
Quick Beginner-Friendly Exercise:
Draw a simple cup using basic shapes.
Add light shading on one side.
Gradually add texture to the handle and surface.
Observe how light affects depth and adjust shadows.
1. How to Make a Beautiful Sketch
Creating a beautiful sketch is less about a single "trick" and more about the mindful application of fundamental principles. It's about seeing the world in shapes and values, not just objects. Start with a light hand, using basic shapes to map out your subject. Think of circles for heads, cylinders for limbs, and boxes for buildings. This initial framework, called a gestural drawing, captures the movement and proportion of your subject.
Once you have your basic structure, gradually build up your sketch. Focus on line quality—varying the thickness and darkness of your lines can add life and visual interest. Use a darker, more confident line for the final contour of your subject and lighter, more delicate lines for internal details. Remember, a "beautiful" sketch often isn't perfect; it's one with character and emotion.
What Materials Are Needed for Sketching?
You don't need to break the bank to get started with sketching. The right tools can make the process more enjoyable and effective, but the most important tool is your eye.
Essentials:
Pencils: A good starting point is a set of sketching pencils with a range of hardness. H-grade pencils (like 2H, 4H) are harder and produce lighter, finer lines, perfect for initial layouts. B-grade pencils (like 2B, 4B, 6B) are softer and create darker, richer lines, ideal for shading and adding depth. A simple HB or 2B pencil is a great all-around choice if you're just starting out.
Paper: A sketchbook with good quality, medium-weight paper is perfect. Look for paper that's specifically labeled for sketching or drawing.
Erasers: A standard plastic or vinyl eraser will work well. A kneaded eraser is also great because you can mold it to lift small amounts of graphite without smudging the paper.
Optional but helpful:
Charcoal or Graphite Sticks: These are great for covering large areas with tone and creating very dark, rich blacks.
Blending Stump or Tortillon: These paper tools are used for smoothing out pencil or charcoal marks to create gradients and even tones. A simple tissue or cotton swab can work in a pinch.
A Fineliner Pen: For adding crisp, permanent lines and details to your sketches.
3. How to Improve Sketching Techniques
Improving your technique is a journey of consistent practice and targeted focus.
Master the Basics: Spend time on foundational exercises. Practice drawing perfect circles, squares, and cubes from different angles. Work on hatching (parallel lines) and cross-hatching (overlapping lines) to understand how they create tone and texture.
Study Light and Shadow: Pay attention to how light hits objects and creates shadows. Learning to identify highlights, mid-tones, and core shadows is crucial for creating a sense of form. This is called shading, and it's what makes a flat drawing look three-dimensional.
Practice Perspective: Understand one, two, and three-point perspective to accurately represent depth and space. Even simple objects like a box or a book benefit from being drawn with an understanding of perspective.
What Are Tips for Adding Detail and Depth to Sketches?
Adding detail and depth is what brings a sketch to life. The key is to think in layers and to use contrast.
Start Broad, Then Refine: Don't get lost in the details too early. Establish the overall form and proportions first. Only once you're confident in your foundation should you begin to add smaller details like the texture of a leaf or the folds in fabric.
Use a Range of Values: The term value refers to the lightness or darkness of a color. A sketch with only mid-tones will look flat. To create depth, use your full range of pencils to add deep shadows and bright highlights.
Add Texture: Vary your pencil strokes to mimic the surface of your subject. Use short, jagged lines for rough textures like a rock, and smooth, continuous lines for something like glass or metal.
Vary Line Weight: Using a thick, dark line for the front of an object and a lighter, thinner line for elements further away creates an instant sense of depth and atmospheric perspective.
5. How to Practice Sketching Regularly to Improve Skills
Consistency is the single most important factor in improving your sketching skills.
Set a Schedule: Dedicate a specific time each day or week to sketching. Even 15-20 minutes a day is more effective than one long session every month.
Sketch from Life: Draw what's in front of you. Sketch your coffee cup, the view from your window, or your hand. Drawing from life helps you train your eye to see real-world proportions and forms.
Don't Be Afraid to Make "Bad" Art: Not every sketch will be a masterpiece. The point is to practice, experiment, and learn. The "bad" sketches are just as valuable as the good ones because they teach you what doesn't work.
Use Prompts: If you're stuck for ideas, look for online sketching prompts or challenges. This can help you get out of a rut and try new subjects.


