How do I install a GFCI receptacle?
Installing a Ground Fault Circuit Interrupter (GFCI) receptacle involves electrical work and should be done carefully. Here's a step-by-step guide for installing a GFCI receptacle:
Important Note: Before starting any electrical work, turn off the power to the circuit at the breaker box and use a voltage tester to ensure the power is off. If you're uncertain or uncomfortable working with electrical wiring, consider hiring a qualified electrician.
Materials Needed:
- GFCI receptacle
- Screwdriver
- Wire cutter/stripper
- Voltage tester
- Electrical tape
- Wire connectors
Steps:
Turn Off Power: Go to your circuit breaker box and turn off the power to the circuit where you'll be installing the GFCI receptacle.
Test for Power: Use a voltage tester to double-check that the power is off by checking the receptacle or outlet where you'll be installing the GFCI.
Remove the Existing Outlet: Unscrew and carefully remove the cover plate, then unscrew and carefully remove the existing outlet from the electrical box. Keep the wires separated.
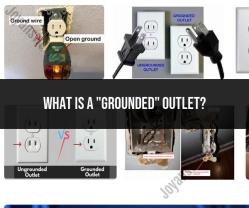
Identify Wires: Identify the wires in the electrical box. You should see three or four wires: black (hot), white (neutral), and bare or green (ground). If there is a fourth wire, it might be red (another hot wire).
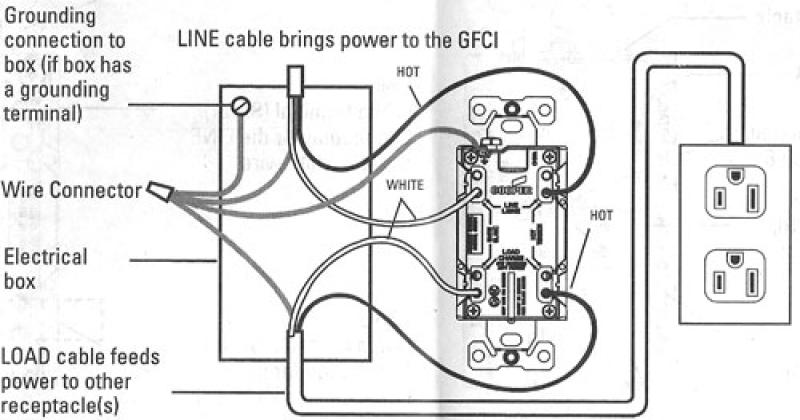
Connect the Wires to the GFCI Receptacle:
- Connect the black (hot) wire to the brass-colored screw terminal labeled "LINE" or "HOT."
- Connect the white (neutral) wire to the silver-colored screw terminal labeled "LINE" or "WHITE."
- Connect the bare or green (ground) wire to the green screw terminal or the grounding screw.
Secure the GFCI Receptacle: Carefully fold the wires into the electrical box while holding the GFCI receptacle. Screw the GFCI receptacle into the electrical box using the screws provided.
Attach Cover Plate: Once the GFCI is securely in place, attach the cover plate over the receptacle using the provided screws.
Turn On Power: After everything is securely connected and the cover plate is installed, go back to the circuit breaker box and turn the power back on to the circuit.
Test the GFCI: Press the "TEST" button on the GFCI receptacle. The "RESET" button should pop out, indicating the GFCI is working. Press the "RESET" button to restore power to the outlet.
Test with a Device: Plug in a device (like a lamp) to ensure the GFCI is providing power. Test the GFCI by pressing the "TEST" button again to ensure it cuts off power.
Remember, if you're unsure or uncomfortable with any step of the installation process, it's best to seek assistance from a qualified electrician to ensure safety and proper installation.
What steps or precautions should be taken when installing a Ground Fault Circuit Interrupter (GFCI) receptacle?
Installing a GFCI receptacle requires careful attention to safety and proper procedure to ensure it functions effectively and protects you from electrical shock. Here are the key steps and precautions to remember:
Before you begin:
- Turn off the power: This is the absolute first step. Locate the circuit breaker that controls the outlet you're working on and switch it off. Double-check with a non-contact voltage tester to ensure there's no current flowing.
- Gather tools and materials: You'll need a screwdriver, wire strippers, wire nuts, the GFCI receptacle, and a GFCI tester.
- Read the GFCI instructions: Every GFCI model has specific instructions, so familiarize yourself with the details before starting.
Installation steps:
- Remove the old receptacle: Unscrew the cover plate, disconnect the wires from the terminal screws, and gently remove the old outlet from the box.
- Prepare the wires: Strip about 1/2 inch of insulation from the ends of the black, white, and bare ground wires.
- Connect the wires: Attach the white wire to the white screw terminal on the GFCI, the black wire to the black screw terminal, and the bare ground wire to the green grounding screw. Use wire nuts for secure connections and tuck them neatly inside the box.
- Install the GFCI: Push the GFCI into the box and secure it with the mounting screws.
- Attach the cover plate: Screw on the cover plate to complete the installation.
Precautions and testing:
- Double-check connections: Ensure all wires are securely connected and no bare wires are touching.
- Turn on the power: Switch the circuit breaker back on.
- Test the GFCI: Press the "Test" button on the GFCI. It should trip and cut off power. Then, press the "Reset" button to restore power. If it doesn't trip or reset, there may be an issue with the installation or the GFCI itself.
- Label the outlet: Use a marker to clearly label the outlet as a GFCI for future reference.
Additional safety tips:
- Work with dry hands and a dry environment to avoid shock risks.
- If you're unsure about any step, consult a qualified electrician for assistance.
- Regularly test your GFCIs, ideally monthly, to ensure they're functioning properly.
By following these steps and precautions, you can safely and effectively install a GFCI receptacle and safeguard yourself and others from electrical hazards. Remember, electricity demands respect and proper handling. If you're not comfortable undertaking the installation yourself, don't hesitate to seek help from a professional.