How do you wire a single phase 230V motor?
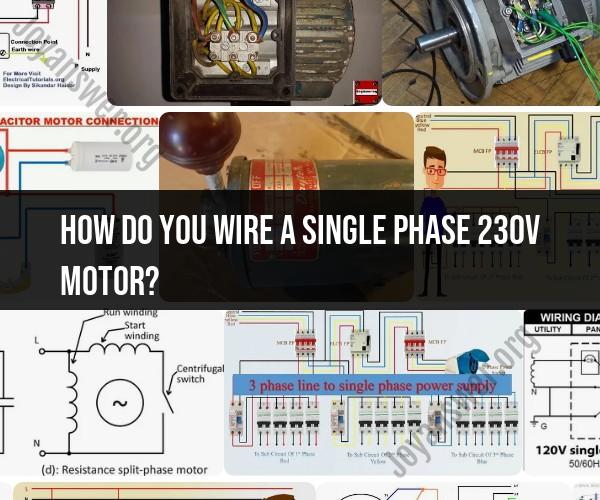
Wiring a single-phase 230V motor involves connecting it to a power source using the proper electrical connections. Here are the general steps to wire a single-phase 230V motor:
Important Note: Before attempting any electrical work, ensure that the power source is turned off and disconnected to prevent electrical shocks or accidents. If you are not experienced with electrical wiring, it is highly recommended to consult a licensed electrician.
Materials and Tools Needed:
- Single-phase 230V motor
- Electrical wire with the appropriate gauge and insulation
- Circuit breaker or disconnect switch
- Junction box
- Wire connectors or wire nuts
- Screwdrivers
- Pliers
- Wire stripper
Steps:
Determine Motor Wiring: Check the motor's nameplate or manufacturer's documentation to determine the correct wiring configuration. Single-phase motors may have different wiring setups, depending on the type and purpose of the motor.
Power Supply: Ensure that you have a reliable 230V power supply with the appropriate circuit breaker or disconnect switch to control the motor.
Connect Grounding: Connect the motor's grounding wire (usually green or bare copper) to the grounding system of the power supply. This wire is essential for safety.
Wire Connections:
- Depending on the motor's wiring configuration, you may need to connect wires to terminals labeled L1, L2, and sometimes a third terminal such as L3 or T2.
- Use wire connectors or wire nuts to secure the connections. Twist the wires together, insert them into the connector or nut, and tighten to ensure a secure connection.
- The color of the wires can vary, but typically, L1 is connected to one of the hot wires (usually black or red), and L2 is connected to the other hot wire.
Check Rotation Direction: Depending on the motor type, you may need to swap the connections to L1 and L2 to change the motor's rotation direction. Refer to the motor's documentation for guidance.
Secure Wiring: Neatly organize the wires and secure them inside a junction box or motor enclosure to prevent them from coming into contact with moving parts or other objects. Close and secure the box or enclosure cover.
Test: After completing the wiring, turn on the power supply to test the motor. Ensure it operates correctly and rotates in the desired direction.
Labeling: It's a good practice to label the wiring connections and the motor itself for future reference and troubleshooting.
Regular Maintenance: Periodically inspect the motor and wiring connections for signs of wear, damage, or loose connections. Proper maintenance helps ensure safe and reliable motor operation.
Always adhere to local electrical codes and safety standards when wiring a motor. If you are unsure about the wiring requirements or if you encounter any issues during the installation process, consult a qualified electrician for assistance. Electrical work can be hazardous, and safety should always be a top priority.
Step-by-Step Guide: Wiring a Single Phase 230V Motor
- Turn off the power to the circuit that you will be connecting the motor to.
- Identify the leads on the motor. There will typically be two or three leads, depending on the type of motor.
- Connect the leads to the power source. If the motor has two leads, connect them to the two hot wires of the power source. If the motor has three leads, connect two of the leads to the two hot wires of the power source, and connect the third lead to the ground wire of the power source.
- Turn on the power to the circuit.
Electrical Connections for 230V Single Phase Motor Operation
The electrical connections for a single phase 230V motor operation are as follows:
- Two lead motor: Connect the two leads to the two hot wires of the power source.
- Three lead motor: Connect two of the leads to the two hot wires of the power source, and connect the third lead to the ground wire of the power source.
Safety Measures When Wiring and Operating 230V Motors
230V motors can be dangerous if not handled properly. Here are some safety measures to follow when wiring and operating 230V motors:
- Always turn off the power to the circuit before working on the motor.
- Use insulated tools to work on electrical circuits.
- Be aware of your surroundings and avoid working on electrical circuits near water or other conductive materials.
- Make sure that the motor is properly rated for the application.
- Install the motor in a safe and secure location.
- Have the motor inspected by a qualified electrician before using it.
Here are some additional safety tips to keep in mind:
- Do not operate the motor if it is damaged or wet.
- Do not overload the motor.
- Do not touch the moving parts of the motor while it is running.
- Be careful of rotating shafts and belts.
- Be aware of the noise level of the motor and take appropriate precautions to protect your hearing.
By following these safety measures, you can help to prevent accidents and injuries when wiring and operating 230V motors.
Disclaimer: If you are not comfortable wiring a 230V motor, it is best to consult with a qualified electrician.
