How do I program the MPPT tracer BN or Xtra-N series solar controller?
Programming the MPPT Tracer BN or Xtra-N series solar controller involves configuring various parameters to optimize the performance of your solar power system. Please note that specific instructions may vary depending on the exact model and version of the controller. Always refer to the user manual provided by the manufacturer for the most accurate and up-to-date information. Below is a general guide on programming these controllers:
Basic Steps for Programming:
Accessing the Display:
- Ensure that the solar controller is properly connected to the solar panels and the battery bank.
- Turn on the solar controller, and access the display. The Tracer BN series typically has an LCD display that allows you to navigate through the settings.
Navigating the Menus:
- Use the navigation buttons on the controller to access different menus and settings. These buttons usually include "Enter," "Up," "Down," and "Esc" (Escape).
Setting Battery Type:
- Navigate to the "Battery Type" setting. Select the appropriate battery type based on your battery specifications (e.g., sealed, gel, flooded).
Setting Battery Voltage:
- Configure the "Battery Voltage" setting to match the voltage of your battery bank (e.g., 12V, 24V, 48V).
Setting Charge Parameters:
- Adjust charge parameters such as "Charging Voltage" and "Charging Current" based on your battery manufacturer's recommendations. This ensures proper charging without overcharging the batteries.
Setting Load Control (if applicable):
- If your solar controller has load control functionality, navigate to the "Load Control" menu. Set parameters such as "Load Work Mode" and "Load Output Control" if you want the controller to manage DC loads.
Setting Temperature Compensation:
- If your solar controller supports temperature compensation, configure the "Temperature Compensation" setting. This helps optimize charging based on temperature variations.
Setting Communication (if applicable):
- Some models have communication ports (e.g., RS-485) for monitoring and control. Set up communication parameters if you intend to connect the controller to a monitoring system.
Saving and Exiting:
- After configuring the parameters, save the settings and exit the programming menu. This is usually done by selecting "Save & Exit" or a similar option.
Monitoring and Maintenance:
- Regularly monitor the solar controller's display to check for system information, charging status, and any error messages. Perform maintenance checks to ensure proper system functioning.
Additional Tips:
Refer to the User Manual:Always refer to the user manual provided by the manufacturer for your specific model. The manual will contain detailed instructions and parameter descriptions.
Default Settings:If you are unsure about specific settings, many controllers have default settings that work for common configurations. Check the user manual for information on default values.
Firmware Updates:Check for firmware updates from the manufacturer's website. Updating firmware can provide improvements and additional features.
Programming a solar controller requires careful consideration of battery specifications, solar panel characteristics, and other system components. If you are uncertain about specific settings, consult with a solar power professional or the manufacturer's support for guidance.
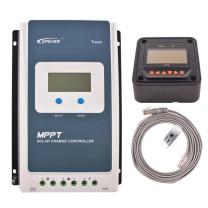
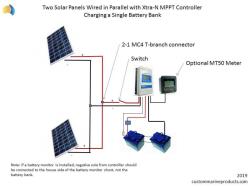
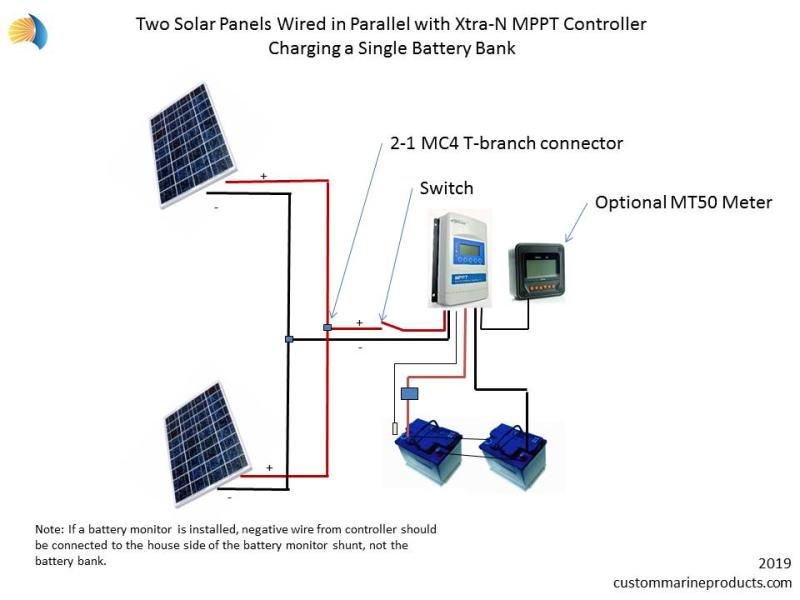
Programming the MPPT tracer BN or Xtra-N series solar controller is a straightforward process that can be accomplished using the MT50 remote meter. Here's a step-by-step guide to programming the controller:
Gather the necessary equipment: You will need the MPPT tracer BN or Xtra-N series solar controller, the MT50 remote meter, and the communication cable.
Connect the MT50 remote meter: Connect the communication cable between the MT50 remote meter and the solar controller's communication port.
Power on the MT50 remote meter: Turn on the MT50 remote meter to establish communication with the solar controller.
Enter programming mode: Press the "Menu" button on the MT50 remote meter to enter the main menu. Scroll down to the "Control Para" option and press "Enter" to access the programming mode.
Set battery parameters: Select the "Battery Type" option and choose the appropriate battery type from the list. Adjust the "Battery Amp Hours" parameter to match the capacity of your battery bank.
Set charging parameters: Select the "Charging Mode" option and choose the desired charging mode (e.g., MPPT, PWM). Adjust the "Charging Voltage" and "Floating Voltage" parameters according to your battery's specifications.
Set discharging parameters: Select the "Discharging Mode" option and choose the desired discharging mode (e.g., automatic, manual). Adjust the "Low Voltage Cut Off" parameter to protect your battery from deep discharge.
Set additional parameters: There are various additional parameters that can be adjusted, such as load control settings, timer settings, and alarm settings. Refer to the user manual for detailed instructions on these settings.
Save and exit programming mode: Once you have adjusted all the desired parameters, press the "Esc" button to exit the programming mode. The MT50 remote meter will store the new settings in the solar controller.
Programming languages or interfaces
The MPPT tracer series does not require any programming languages; instead, it uses the MT50 remote meter as a user interface for configuring the controller's parameters. The MT50 remote meter provides a user-friendly menu system that allows you to easily navigate through the various settings and make adjustments.
Specific settings or parameters to adjust
The specific settings or parameters that you need to adjust will depend on your specific solar system configuration and battery type. However, some of the most important parameters to set include:
Battery type: Select the correct battery type (e.g., lead-acid, gel, lithium) to ensure that the controller charges and discharges the battery properly.
Battery amp hours: Set the battery amp hours parameter to match the capacity of your battery bank. This will help the controller calculate the appropriate charging and discharging currents.
Charging voltage: Adjust the charging voltage to match the recommended charging voltage for your battery type. This will ensure that your battery is fully charged without overcharging.
Floating voltage: Set the floating voltage to maintain your battery at a safe charging level after it has been fully charged. This will help extend the life of your battery.
Low voltage cut off: Adjust the low voltage cut off parameter to protect your battery from deep discharge, which can damage the battery.
Load control settings: Configure the load control settings to control when and how the controller supplies power to your DC loads.
Timer settings: Set timer settings to control when the controller turns on and off, or to operate in a time-of-day or load-based control mode.
Alarm settings: Configure alarm settings to alert you of potential problems, such as high or low battery voltage, high or low load current, or overtemperature conditions.
By carefully adjusting these parameters, you can optimize the performance of your solar system and ensure that your battery is properly charged and protected. Remember to consult the user manual for detailed instructions on setting specific parameters and troubleshooting any issues.