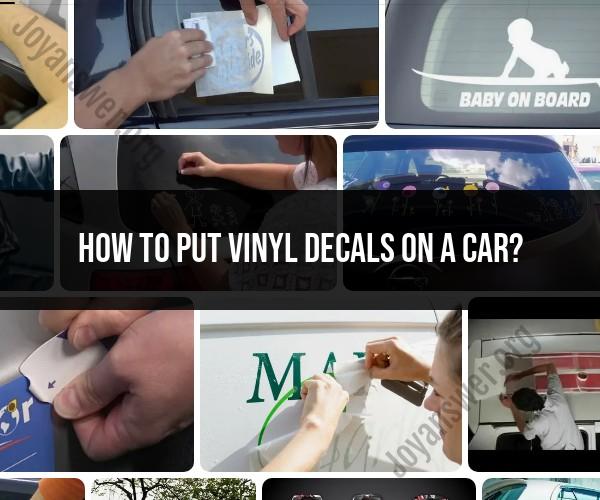
How to put vinyl decals on a car?
Applying vinyl decals to your car is a popular way to add personalization or branding to your vehicle. Here are step-by-step instructions on how to put vinyl decals on a car:
Materials You'll Need:
- Vinyl decal
- Cleaning supplies (isopropyl alcohol, microfiber cloth)
- Masking tape or painter's tape
- Squeegee or credit card
- Scissors or a utility knife
- Measuring tape or ruler
- Application fluid (optional, a mixture of water and a few drops of dish soap)
Step-by-Step Instructions:
Choose a Suitable Location:
- Decide where you want to place the vinyl decal on your car. Ensure it's a clean, flat surface, and consider the size and design of the decal in relation to the area.
Clean the Surface:
- Thoroughly clean the chosen area with isopropyl alcohol and a microfiber cloth to remove any dirt, wax, or residue. A clean surface is essential for proper adhesion.
Prepare the Decal:
- If your decal comes with transfer tape, carefully peel the backing away from the transfer tape, exposing the adhesive side of the decal. If there is no transfer tape, skip this step.
Apply Masking Tape:
- Use masking tape or painter's tape to secure the decal in the desired position on the car. This helps ensure that it doesn't shift during the application process.
Position the Decal:
- Carefully position the decal on the car's surface, making sure it's aligned as you want it. Use a measuring tape or ruler to maintain accuracy if necessary.
Use Application Fluid (Optional):
- For larger decals or complex designs, you can create an application fluid mixture by adding a few drops of dish soap to water. Spray this mixture on the car's surface and the adhesive side of the decal. This makes it easier to reposition the decal if needed.
Apply the Decal:
- Starting from one edge, use the squeegee or a credit card to firmly press the decal onto the car's surface, working out any air bubbles as you go. Use even, consistent pressure to ensure proper adhesion.
Remove Transfer Tape (if applicable):
- If your decal has transfer tape, gently peel it away at an angle, starting from one corner. Ensure that the vinyl adheres to the car's surface, and carefully remove the tape.
Smooth and Finish:
- Go over the entire decal with the squeegee or credit card again to ensure a secure bond with the car's surface. Pay attention to any edges or corners to prevent them from lifting.
Trim Excess Vinyl (if necessary):
- If your decal has excess vinyl material beyond the design, you can use scissors or a utility knife to carefully trim it away.
Let It Set:
- Allow the decal to set and adhere to the car for at least 24 hours. Avoid washing the car during this time to ensure the vinyl has a chance to bond securely.
Maintenance:
- To maintain the appearance and longevity of the vinyl decal, avoid using abrasive cleaners or scrubbing the decal directly. Instead, wash the car gently and avoid high-pressure car washes.
Keep in mind that applying vinyl decals may vary slightly depending on the decal's size, shape, and complexity. It's essential to work slowly, accurately, and patiently to achieve the best results. If you're not confident in your application skills, you can also seek professional installation from a local graphics or sign shop.
Applying Vinyl Decals to Your Car: Step-by-Step Instructions
To apply vinyl decals to your car, follow these steps:
- Clean the area where you want to apply the decal. Use a mild soap and water solution to remove any dirt, dust, or wax.
- Dry the area thoroughly.
- Peel the backing paper off the decal. Be careful not to touch the adhesive side of the decal.
- Position the decal on your car. Make sure it is centered and level.
- Apply the decal by gently pressing down on it with your fingers. Start from the center and work your way out to the edges.
- Use a squeegee or credit card to remove any air bubbles.
- Allow the decal to dry completely before driving your car.
Customizing Your Vehicle with Vinyl Decals
Vinyl decals are a great way to customize your vehicle and make it stand out from the crowd. You can use decals to add your favorite colors, designs, or logos to your car. You can also use decals to cover up scratches or dents.
Here are some ideas for customizing your vehicle with vinyl decals:
- Add your favorite sports team logo or mascot to your car.
- Add your favorite character or quote from a movie or TV show.
- Add a funny or inspirational saying to your car.
- Add a tribal design or other decorative element.
- Cover up a scratch or dent with a decal.
Preparing and Positioning Decals for a Professional Look
To achieve a professional look when applying vinyl decals to your car, it is important to prepare and position the decals correctly. Here are some tips:
- Make sure the area where you want to apply the decal is clean and dry.
- Use a squeegee or credit card to remove any air bubbles.
- Position the decal carefully before pressing it down.
- If you are applying multiple decals, make sure they are aligned and spaced evenly.
Maintaining and Caring for Vinyl Decals on Your Car
Vinyl decals are relatively durable, but they will eventually need to be replaced. To extend the life of your vinyl decals, it is important to maintain and care for them properly. Here are some tips:
- Wash your car regularly with soap and water. Avoid using harsh chemicals or abrasive cleaners.
- Wax your car regularly to protect the decals from the elements.
- If you park your car in the sun, cover the decals with a piece of cloth or a tarp.
- If a decal starts to peel, you can try to repair it with a small amount of adhesive. However, it is often best to simply replace the decal.
Showcasing Your Style with Creative Decal Designs
Vinyl decals can be used to create a variety of creative designs for your car. Here are a few ideas:
- Create a mural on your car using multiple decals.
- Use decals to create a unique racing stripe design.
- Use decals to add a personal touch to your wheels or tires.
- Use decals to decorate your car for a holiday or special event.
No matter what your style is, there is a vinyl decal design that is perfect for you. Get creative and have fun customizing your vehicle!